Saturday, November 04, 2006

DC Motor control with potentiometer

Included a potentiometer to change the speed of the motor...

Here is the code:

int switchPin = 2; // switch input
int motor1Pin = 3; // H-bridge leg 1
int motor2Pin = 4; // H-bridge leg 2
int speedPin = 9; // H-bridge enable pin
int ledPin = 13; //LED

int potPin = 0; //Analogue input from Potentiometer
int potValue = 0; //Value being read from Potentiometer

void setup() {

Serial.begin(9600); //Beggin serial communication

// set the switch as an input:
pinMode(switchPin, INPUT);

// set all the other pins you're using as outputs:
pinMode(motor1Pin, OUTPUT);
pinMode(motor2Pin, OUTPUT);
pinMode(speedPin, OUTPUT);
pinMode(ledPin, OUTPUT);
}

void loop() {

potValue = analogRead(potPin); //Read pot value
Serial.println(potValue); //print value to debugg

// if the switch is high, motor will turn on one direction:
if (digitalRead(switchPin) == HIGH) {
digitalWrite(motor1Pin, LOW); // set leg 1 of the H-bridge low
digitalWrite(motor2Pin, HIGH); // set leg 2 of the H-bridge high
digitalWrite(ledPin, HIGH); //Light up LED for debugging
analogWrite(speedPin, potValue/4); //Write to speed pin to change speed
}
// if the switch is low, motor will turn in the other direction:
else {
digitalWrite(motor1Pin, HIGH); // set leg 1 of the H-bridge high
digitalWrite(motor2Pin, LOW); // set leg 2 of the H-bridge low
analogWrite(speedPin, potValue/4); //Write to speed pin to change speed
blink(ledPin, 3, 100); //Blink LEDs for debugging
}

delay(10); //Delay before next loop
}

/*
blinks an LED
*/
void blink(int whatPin, int howManyTimes, int milliSecs) {
int i = 0;
for ( i = 0; i < howManyTimes; i++) {
digitalWrite(whatPin, HIGH);
delay(milliSecs/2);
digitalWrite(whatPin, LOW);
delay(milliSecs/2);
}
}

Here is the picture of the circuit:


Here is the video of it working:

LAB - DC Motor Control Using H-bridge

First version of circuit... when switch is pressed, direction of motor rotation is reversed...

Wednesday, November 01, 2006

RUG Video

Arduino Code

//RUG

//PIN Numbers
int okPin = 3;
int buzzPin = 2;
int rugPin = 4;
int readPin = 5;

//PIN variables
int rugValue;

//RFID serial read variables
int val = 0; // variable to store the data from the serial port: 1 = start of byte
int serbyte = 0; // variable to store the VALID data from the port
int length; //length of byte coming through
int status; //serial read data from RFID tag
int data[80]; //data array read from RFID tag
int tagID; //tag to be tracked - set during reset procedure

void setup() {

//Set Pin modes
pinMode(okPin, OUTPUT);
pinMode(buzzPin, OUTPUT);
pinMode(rugPin, INPUT);
pinMode(readPin, OUTPUT);

//Set PIN states
digitalWrite(okPin, LOW);
digitalWrite(buzzPin, LOW);
digitalWrite(readPin, LOW);

Serial.begin(9600); // connect to the serial port

//TEMP
tagID = 55;
}

void loop ()
{
// read the serial port
serbyte = Serial.read();
if (serbyte != -1) {
val = serbyte;
}
else {
val = 0;
}

//If val is 1, its at start of tag reading - read it all to flush
if (val == 1) {
digitalWrite(13, HIGH);
length = Serial.read();
status = Serial.read();
for (int i = 0; i < length - 1; i++){
data[i] = Serial.read();
//Serial.print(data[0]);
//Serial.print(" ");
}
}

//Read RUG switch and serial
rugValue = digitalRead(rugPin); //rugValue = 0 if stepped on
Serial.print(rugValue);

if (rugValue == 1){
if (val == 1){
digitalWrite(buzzPin, LOW);
digitalWrite(okPin, HIGH);
}
else if (val == 0) {
digitalWrite(okPin, LOW);
digitalWrite(buzzPin, HIGH);
}
}
else {
digitalWrite(okPin, LOW);
digitalWrite(buzzPin, LOW);
}


delay(200);

}

RUG Design

Here is a link to the final design we propose and the pictures of our physical model:

Pictures of physical model

Tuesday, October 24, 2006

Response from Ed Purver

I like the idea, because I am the kind of person who forgets stuff like my metrocard, or my phone, etc..., so it definitely has a use.

But I would hesitate to buy it until I was reassured that there were no health issues to having a bunch of RFID tags on my person ALL THE TIME... and some people might have privacy issues, with making themselves so trackable?

Before I bought it, I'd need to know why this was so much better than a piece of paper on my front door reminding me not to forget my keys, etc

I think the alarm would have to be sound. The sound would have to come from the device (not my own phone, which I may have left in my room), and I would have to be able to load my own audio files onto the device, otherwise it would drive me crazy. And I want a different sound for each object it is detecting, so I don't have to spend time working out which object I have not got...
On Oct 23, 2006, at 4:28 PM, Anne Hong wrote:

1. Would you use it? I would definitely give it a try. The most important aspects would be immediacy and priority. Would I recieve this alarm as soon as I open the door, or is it after I'm in the lobby or outside in the subway? If I knew it was my wallet, then it would be worthwhile for me to go back upstairs and get it versus a cellphone. I think it might be a little too late to worry about my keys until after I got back to call the super. I sometimes forget, but I assess if it's worth my time to go back.
2. Would you prefer alarms to be light only, sound only or both alarms? Vibrating cellphone or alarm is sufficient for me.
3. Would you stick the Tags on your wallet, cell, key, etc...? I would use these tags on items that I don't use frequently. Maybe it's a book or a paper I need for a group discussion that I'm more likely to forget at home.
4. Comments?

DigiKey Order - RFID order in!

RFID reader
Transponders:
- Glass
- Card
- Key Ring
Antenna

Monday, October 23, 2006

Response from Kunal Gupta

1) hm.. although i like ti the way it is, i think the aesthetics of the object have to be real good, like it has to blend in with environments more .
i think the display works well on a wall.

2) sound is cool, light si cool, ion a wall

3) it's ideal for keys/cell phone/ wallet/medicine etc.

4) medicine? What the fuck am i talking abot?

<3
Kunal

Response from Anne Hong

1. Would you use it? I would definitely give it a try. The most important aspects would be immediacy and priority. Would I recieve this alarm as soon as I open the door, or is it after I'm in the lobby or outside in the subway? If I knew it was my wallet, then it would be worthwhile for me to go back upstairs and get it versus a cellphone. I think it might be a little too late to worry about my keys until after I got back to call the super. I sometimes forget, but I assess if it's worth my time to go back.
2. Would you prefer alarms to be light only, sound only or both alarms? Vibrating cellphone or alarm is sufficient for me.
3. Would you stick the Tags on your wallet, cell, key, etc...? I would use these tags on items that I don't use frequently. Maybe it's a book or a paper I need for a group discussion that I'm more likely to forget at home.
4. Comments?

Response from J0sh

Your web page made my web browser crawl to a halt, so I can't give you
feedback on that, but I'd love to give you some feedback as I'm really
interested in the project!

1. Would you use it?

Yep.

2. Would you prefer alarms to be light only, sound only or both alarms?

Either, depending on the item (my choice).

3. Would you stick the Tags on your wallet, cell, key, etc...?

Depends on how big they are. If you're talking passive RFID (grain-of-rice-sized) I'd put them everywhere, but if they're key-chain-fob-sized I'd put them on my keys only.

4. Comments?

How configurable, what's the interface, what's the sound/light alarm
like, what size is the fob?

- J0sh

Response from rui pereira

hey guys!

luvly project!

i would buy it for sure, actually.. build it fast>>>>> i want one!!!
regarding ur q's::
1. Would you use it? YES!

2. Would you prefer alarms to be light only, sound only or both alarms? both, sometimes(most of the times) i use ipod so light would b great but also sound is great when u just woke up and don´t see anything in front of u...

3. Would you stick the Tags on your wallet, cell, key, etc...? huuum.... wallet.. may b.. keys , ipod!, phone, camera, and may b not only this but also important books or objects i would need in a specific day

4. Comments?
modularity, because of what i've just answered in the previous q, each day is a different day, so there r objects i always carry with me
but there r also some special stuff in specific days that would b great to not forget..


goood luck and great werk!!!!


rui

Response from Joshua Fleig

I think its a great idea. What if instead of alarm it said "keys"?? Also what about umbrella?? you could have it check weather.com every morning and remind you to get your umbrella.

Also I have an idea that may fall into a similar catagory that I am looking to do possible for a final project remind me to talk to you about it.

Josh

Email sent out

Sent out the following email to ipt-students list - waiting for responses ;)

****

R.U.G. - "Remember Ur Goods"
Reminder device for those out in a hurry

This is our Phys-Comp midTerm project.

We are in dire need of feedback for the usability testing

Since our prototype is not ready, we invite you all to take an incredible
"virtual tour" of our idea!!

http://itp.nyu.edu/~ll1020/pcomp/rug/index.html

And if possible give us some quick feedback!

1. Would you use it?
2. Would you prefer alarms to be light only, sound only or both alarms?
3. Would you stick the Tags on your wallet, cell, key, etc...?
4. Comments?

Thank you!!

Lucas

***

Saturday, October 21, 2006

RUG SIMULATION

Here is a simulation of how our product will work conceptually.

RUG

RUG = Remember U Goods

For simplicity, size, and power constraints we decided to go with a rug design instead of yet another portable device for you to forget.

Advantages of the RUG design:

1. Never forget the rug - it is stationary
2. Activate by stepping on it
3. Power source could be larger or even AC power supply from the wall
4. Would fit an RFID reader more easily
5. Can incorporate a better interface for feedback

Now we actually have to build this thing:

HARDWARE NEEDS:

1. LEDs
a) OK - goes off when all items are near
b) Red - Item Missing
c) Green - Missing
d) Blue - Missing
2. Buttons
a) Reset/Start Button - used to collect items that will be tracked
b) Activating Buttons (flat and resistant to place under carpet)
3. Casing
a) Display LEDs
b) Reset/Start Button
c) RFID reader
d) Power supply
4. Speaker
a) OK Sound
b) Item Missing Sound
5. RFID Reader & Tags
6. Battery/Power supply
7. Arduino microcontroller
8. Wires/sodder

SOFTWARE NEEDS:

1. Check to see if RUG is being stepped on
2. Read RFID tags
3. Blink appropriate LEDs
4. Play appropriate sound

Saturday, October 14, 2006

MidTerm Prototype halfway there

For our midterm we decided to create a device that would tell you if you have everything you usually carry around - basically a tool that will not let you forget your stuff when you leave the house.

Here is some data we collected to start off with - NYC Bags - click through to see all the data collected.

From we decided that the ideal product would be something small that you could carry with you.

When you squeeze it, it should vibrate telling you that all you want is there... if it is not all there, then LEDs will indicate which item you are missing.

Ideally the squeeze device woul be wireless and you would simply place wireless transmitter stickers on the objects you do not want to forget.

Also - to make the system fool proof, we would install a "missing detector" on the door frame of your house. Your door would tell you if you were forgetting anything as you left the house.

Pong code not working the way I want it to

For some reason the code "half" works...

When I start my Processing code, my gLed is ON... should be off (set both Leds to LOW in the void section)

Also - when I start playing the game, I wanted the LEDS to blink when the ball hit the paddle... but that slows the entire game down tremendously...

My guess is that the lighting of the pins should occur somehow in sync with the serial event part of the code...

Here is the code... put in BOLD the relevant parts...
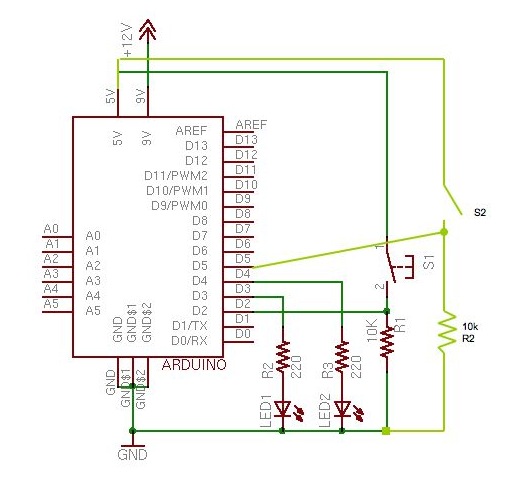
ARDUINO CODE:

int firstSensor = 0; // first analog sensor
int secondSensor = 0; // second analog sensor
int thirdSensor = 0; // digital sensor
int inByte = 0; // incoming serial byte
int yLed = 3;
int gLed = 4;

void setup()
{
// start serial port at 9600 bps:
Serial.begin(9600);

pinMode(yLed, OUTPUT);
pinMode(gLed, OUTPUT);

digitalWrite(yLed,LOW);
digitalWrite(gLed,LOW);
}

void loop()
{
// if we get a valid byte, read analog ins:
if (Serial.available() > 0) {
// get incoming byte:
inByte = Serial.read();
// read first analog input, divide by 4 to make the range 0-255:
firstSensor = analogRead(0)/4;
// delay 10ms to let the ADC recover:
delay(10);
// read second analog input, divide by 4 to make the range 0-255:
secondSensor = analogRead(1)/4;
// read switch, multiply by 255
// so that you're sending 0 or 255:
thirdSensor = 255 * digitalRead(2);
// send sensor values:
Serial.print(firstSensor, BYTE);
Serial.print(secondSensor, BYTE);
Serial.print(thirdSensor, BYTE);

//digitalWrite(yLed, HIGH);
digitalWrite(gLed, HIGH);

if (Serial.read() == 66)
{
digitalWrite(yLed, HIGH);
delay(1000);
digitalWrite(yLed, LOW);
}
else if (Serial.read() == 67)
{
digitalWrite(gLed, HIGH);
delay(1000);
digitalWrite(gLed, LOW);
}
}
}

********************************

PROCESSING CODE:

import processing.serial.*;

Serial port; // The serial port
int[] serialInArray = new int[3]; //Array for serial input signals
int serialCount = 0; // A count of how many bytes we receive
float rightControl, leftControl, resetButton; // Controls
boolean firstContact = false; // Whether we've heard from the microcontroller

PFont font;

//Game Initial Settings
int screenW = 800; //Screen Widht
int screenH = 800; //Screen Height
float ballSpeed = 6; //Initial Ball Speed
float ballSize = 50; //Initail Ball Size

//Game initial stats
int scoreL = 0; //Left player score
int scoreR = 0; //Right player score

int previousScore = 0; //Previous moment's score to determine pause or start state
int level = 1; //Game Level
int previousLevel = 0; //Previous moment's leve to determine scoring

int playgame = -1; //Flag to see if game is paused
int started = 0;

Pong pong; //Pong class variable - each level is a new class

void setup() {
size(screenW,screenH);
frameRate(30);
smooth();
font = loadFont("CourierNew36.vlw");

pong = new Pong(1);

// Print a list of the serial ports, for debugging purposes:
//println(Serial.list());

// Open whatever port is the one you're using.
port = new Serial(this, Serial.list()[0], 9600);
port.write(65); // Send a capital A to start the microcontroller sending
}

void draw() {

background(0);

// If no serial data has beeen received, send again until we get some.
if (firstContact == false) {
delay(300);
port.write(65);
}

//Call class to draw the table/game
pong.drawGameTable();

//If score is over 5 go to next level - reset counters on the way
if (scoreR + scoreL > 5)
{
previousLevel = level;
level++;
pong = new Pong(level);
scoreR = 0;
scoreL = 0;
}
}

//------------------------------
void serialEvent(Serial port) {

float[] buttonFlag = new float[1000];
int i = 0;
int flag = 1; //flag to see if any of the buttonFlags are 0

// if this is the first byte received,
// take note of that fact:
if (firstContact == false) {
firstContact = true;
}
// Add the latest byte from the serial port to array:
serialInArray[serialCount] = port.read();
serialCount++;

// If we have 3 bytes:
if (serialCount > 2 ) {
leftControl = serialInArray[0];
rightControl = serialInArray[1];
resetButton = serialInArray[2];

//println(resetButton);

/*
//If button state changes to zero somewhere along the array, reset game
if (i == 1000) //If i hits 1000, reset back to zero
{
i = 0;
}
i++; //Increment i

buttonFlag[i] = resetButton;

for (int c = 0; c < 1000; c++)
{
if (buttonFlag[c] == 0)
{
flag = 0;
}
}

if (flag == 0)
{
playgame = playgame * -1;
flag = 1;
}
*/

// Send a capital A to request new sensor readings:
port.write(65);

// Reset serialCount:
serialCount = 0;
}
}

//------------------------------
void mouseReleased()
{
playgame = playgame * -1;
}

*************************
class Pong
{
//Ball parameters
float ballX = screenW/2;
float ballY = screenH/2;

//Location of players
float leftX = 20, leftY = screenH/2;
float rightX = screenW - 20, rightY = screenH/2;

//Size of stick
float stickW = 10, stickH = 60;

//Direction
int ballXdirection = 1;
int ballYdirection = 1;


Pong(int _level)
{
level = _level;
ballSize = ballSize - level * 1.10;
ballSpeed = ballSpeed + level * 1.001;
playgame = -1;
}
//-----------------------------------------------------------------------------
void drawGameTable()
{
//External Box and middle line
background(0);
rectMode(CORNER);
strokeWeight(2);
stroke(255);
fill(0);

rect(5, 5, screenW-10, screenH-10);
line(screenW/2, 5, screenW/2, screenH-5);

//Game values
rect(screenW/2-65,10,125,40);
textFont(font, 30);
fill(255);
text(scoreR, screenW/2-40, 32);
text(scoreL, screenW/2+25, 32);
text("x",screenW/2-8,32);
textFont(font, 15);
text("Level ", screenW/2-30, 47);
text(level, screenW/2+20, 47);

// If Mouse is pressed play the game - pressed again - reset game
if (playgame < 0)
{
rectMode(CORNERS);
fill(200,200,200,50);
rect(0,0,screenW,screenH);

if ((started == 0) || (level > previousLevel))
{
fill(255);
text("PRESS MOUSE TO START",screenW/2-100,screenH/2);
previousLevel = level;
ballX = screenW/2;
ballY = screenH/2;
}
else if ((started == 1) || (scoreR + scoreL == previousScore))
{
fill(255);
text("PRESS MOUSE TO CONTINUE",screenW/2-100,screenH/2);
}
}
else if (playgame > 0)
{
started = 1;
pong.moveLeftStick();
pong.moveRightStick();
pong.drawBall();
}
}
//-----------------------------------------------------------------------------
void drawBall()
{
// Update the position of the ball
ballX = ballX + ( ballSpeed * ballXdirection );
ballY = ballY + ( ballSpeed * ballYdirection );

//Ball hitting one of the paddles?
if (dist(ballX,ballY,rightX,rightY) < (ballSize/2+stickW-2))
{
ballXdirection *= -1;
port.write(66);
}

//Ball on Comp side and within Comp paddle?
if (dist(ballX,ballY,leftX,leftY) < (ballSize/2+stickW-2))
{
ballXdirection *= -1;
port.write(67);
}

//Dont let ball go of screen vertically
if (ballY > ((screenH - 8) - ballSize/2) || (ballY < ballSize/2 + 6))
{
ballYdirection *= -1;
}

//SCORE POINTS
if (ballX > rightX + ballSize)
{
playgame = -1;
previousScore = scoreR + scoreL;
scoreR++;
ballX = screenW/2;
ballY = screenH/2;
leftY = screenH/2;
rightY = screenH/2;
}
if (ballX < leftX - ballSize)
{
playgame = -1;
scoreL++;
ballX = screenW/2;
ballY = screenH/2;
leftY = screenH/2;
rightY = screenH/2;
}

//Draw Ball
fill(random(255),random(255),random(255));
ellipseMode(CENTER);
ellipse(ballX, ballY, ballSize, ballSize);
}
//-----------------------------------------------------------------------------
void moveRightStick()
{
rectMode(CENTER);

if (rightY+stickH/2-20 > screenH) {
rightY = screenH-stickH/2-20;
}
else if (rightY-stickH/255-20 < 0) {
rightY = stickH/2 + 21;
}
else {
rightY = (rightControl/255)*screenH;
//rightY = ballY;
}

//Draw Right Paddle
fill(0,0,255);
rect(rightX,rightY,stickW,stickH);

}
//-----------------------------------------------------------------------------
void moveLeftStick()
{
rectMode(CENTER);

if (leftY+stickH/2-10 > screenH) {
leftY = screenH-stickH/2;
}
else if (leftY-stickH/2+5 <= 10) {
leftY = stickH/2 + 12;
}
else {
leftY = (leftControl/255)*screenH;
//leftY = ballY;
}
//Draw left paddle
fill(255,0,0);
rect(leftX,leftY,stickW,stickH);
}
}

Friday, October 13, 2006

PLAY PONG!

So... got Arduino to talk to Processing...

Tuesday, October 10, 2006

HW4 - Servo motor

Servo Motor worked well - things starting to MOVE!!

Sunday, October 01, 2006

HW 3 - Analogue input worked ok

Analogue input worked ok


Tuesday, September 26, 2006

HW Week 2 DONE!

Ok - got Arduino and my computer to talk correctly...

First part of assignmnet - push button switch lights 2 different lights alternatively:

Green LED on:


Yellow LED on when pressing switch:


Second part of assignment - Lighting Control

Switch 1 toggles between continous or strobe yellow light mode - green light indicates strobe mode (LED ON) and continuous mode (LED OFF). Strobe mode blinks yellow light 8 times.

Here is the video:

Light House project

Light house controller that controls how long light stays ON and OFF.

LEDs indicate if you are increasing or decreasing ON and OFF times.

Brigth LED is the Light House beacon.

Here is the program:

//Light Houes Controller

//Swtiches
int switchONMore = 2; // Increases ON time
int switchONLess = 3; // Decreases ON time
int switchOFFMore = 4; // Increases OFF time
int switchOFFLess = 5; // Decreases OFF time

//LEDs
int LightHouseLed = 6; //Beacon
int OnMoreLed = 7; // ON MORE LED
int OnLessLed = 8; // ON LESS LED
int OffMoreLed = 9; // OFF MORE LED
int OffLessLed = 10; // OFF LED 1

//Variables
int OnTime; //Time light will be ON - 0 to 3 (short to long)
int OffTime; //Time ligth wlll be OFF - 0 to 3 (short to long)
int OnMore; //Increase OnTime
int OnLess; //Decrease OnTime
int OffMore; //Increase OffTime
int OffLess; //Decrease OffTime
int IndLight = 3000; //Indicator light time

void setup() {
//Set Input Pins
pinMode(switchONMore, INPUT); // set the switch pin to be an input
pinMode(switchONLess, INPUT); // set the switch pin to be an input
pinMode(switchOFFMore, INPUT); // set the switch pin to be an input
pinMode(switchOFFLess, INPUT); // set the switch pin to be an input

//Set Output Pins
pinMode(LightHouseLed, OUTPUT); //Lighthouse beacon LED
pinMode(OnMoreLed, OUTPUT); // set LED to be an output
pinMode(OnLessLed, OUTPUT); // set LED to be an output
pinMode(OffMoreLed, OUTPUT); // set LED to be an output
pinMode(OffLessLed, OUTPUT); // set LED to be an output
}

void loop() {
// Read the switch inputs:
OnMore = digitalRead(switchONMore);
OnLess = digitalRead(switchONLess);
OffMore = digitalRead(switchOFFMore);
OffLess = digitalRead(switchOFFLess);

//Increase or decrease timers and indicate on LED
if (OnMore == 1){
OnTime = OnTime + 1;
digitalWrite(OnMoreLed, HIGH); // turn ON indicator
delay(IndLight);
digitalWrite(OnMoreLed, LOW); // turn OFF indicator
}
if (OnLess == 1){
OnTime = OnTime - 1;
digitalWrite(OnLessLed, HIGH); // turn ON indicator
delay(IndLight);
digitalWrite(OnLessLed, LOW); // turn OFF indicator
}
if (OffMore == 1){
OffTime = OffTime + 1;
digitalWrite(OffMoreLed, HIGH); // turn ON indicator
delay(IndLight);
digitalWrite(OffMoreLed, LOW); // turn OFF indicator
}
if (OffLess == 1){
OffTime = OffTime - 1;
digitalWrite(OffLessLed, HIGH); // turn ON indicator
delay(IndLight);
digitalWrite(OffLessLed, LOW); // turn OFF indicator
}

//Blink LightHouse beacon
digitalWrite(LightHouseLed, HIGH); // turn ON beacon
delay(OnTime);
digitalWrite(LightHouseLed, LOW); // turn ON beacon
delay(OffTime);

/*
//STROBE routine
while (switchOnOff == 1 && switchToggle == 1){
//ON and on STROBE
digitalWrite(brightLedPin, HIGH); // turn on LED
delay(3000);
digitalWrite(brightLedPin, LOW); // turn off LED
}

//CONTINUOUS MODE
if (switchOnOff == 1 && switchToggle == 0) {
digitalWrite(brightLedPin, HIGH); // turn on LED
}
else {
digitalWrite(brightLedPin, LOW); // turn off LED
}
*/
}

Now to the wiring!

Sunday, September 24, 2006

HW 2 Attempt

Since I did not get Arduino to work I am posting what I wanted to do with the switch:

Light controller:

Switch 1 toggles from STROBE to CONTINUOUS lighting
Switch 2 turns ligt ON or OFF

Arduino compiled program:

//Light switch

int switchToggle = 5; // Toggles between STROBE or CONTINUOUS
int switchOnOff = 2; // On Off switch
int brightLedPin = 3; // Light source LED
int dimLedPin = 4; // Indicator LED LED INDICATOR => OFF = CONTINUOUS ON = STROBE
int toggleState = 0; // CONTINUOUS = 0 STROBE = 1
int OnOffState = 0; // ON = 1 OFF = 0

void setup() {
pinMode(switchToggle, INPUT); // set the switch pin to be an input
pinMode(switchOnOff, INPUT); // set the switch pin to be an input
pinMode(brightLedPin, OUTPUT); // set the bright LED pin to be an output
pinMode(dimLedPin, OUTPUT); // set the dim LED pin to be an output
}

void loop() {

// Read the switch input:
switchToggle = digitalRead(switchToggle);
switchOnOff = digitalRead(switchOnOff);

//LED INDICATOR OFF = CONTINUOUS, ON = STROBE
if (switchToggle == 0){
digitalWrite(dimLedPin, LOW); // turn off indicator
}
else {
digitalWrite(dimLedPin, HIGH); // turn ion indicator
}

//STROBE routine
while (switchOnOff == 1 && switchToggle == 1){
//ON and on STROBE
digitalWrite(brightLedPin, HIGH); // turn on LED
delay(3000);
digitalWrite(brightLedPin, LOW); // turn off LED
}

//CONTINUOUS MODE
if (switchOnOff == 1 && switchToggle == 0) {
digitalWrite(brightLedPin, HIGH); // turn on LED
}
else {
digitalWrite(brightLedPin, LOW); // turn off LED
}
}

Now have to check to see if I wired the On/Off toggle switch correctly...

Week 1 Class Notes

House Rules
• 10 minutes late – no talking during class

Lesson today – “Enough physics to make a flashlight”

When buying a flashlight you look at:
• Durability
• Light intensity
• What kind of batteries
• How many batteries
• Environmental considerations
• Cost
• Weight
• Cost of upkeep
• Initial investment
• Size
• Rechargeable
• Water proof / floating
• Aesthetics
• Batteries included?
• Brand
• Kind of bulb – durability
• Color of light
• How do direct the light
• All these are design and market niche considerations, unless these were considerations for industrial applications.

What do they all have in common?
• Power source
• Bulb/lamp
• On/off switch

What is different
• Color – appeal / intended audience / preferences / marketing
• Size & shape – how you hold / use it / where – ergonomics
• Texture of material
• Shape of beam
• Brightness
• Physical style of switch – some stay on, some you have to hold to stay on

• Because of these differences you should learn the physical computing side of things.

Terms / jargon on the package we do not recognize:
• LED
• 6V latten battery
• KPR 113 – K13 bulb
• 120V AC
• 2.5 Volts
• 0.3 amps
• 60 Hz
• H14 flashlight bulb
• Krypton bulb
• Polarized
• Adapter
• Watts

Let’s build a flashlight
• Biking headlight – to see or to be seen
• Headlight to work on pComp project w/o waking up roommates
• Laser pointer
• Purse light

Glasses
• Limiting factor – what should we worry about the most?
• Size and weight
• Color
• Switch style
• Bulb
• LED (Light Emitting Diode)

When shopping for light bulb you look for Power/Watts – which do NOT relate to brightness
• Watts = Power = Volts/second
• www.jameco.com - good for browsing
• Opto & illumination
• Lamps – incandescent

Description is size & shape
• It’s light
• It’s small
• It does not heat up
• Consumes less power
• Brightness / Luminous intensity
• MSCP (Mean Spherical Candle Power)
• MCD (Milli candela)

Watts
• Ability to do work
• Energy/time
• E = mc2
• E = force x distance
• Mass ≠ weight
• Weight depends on gravity
• Mass is resistance to change
• m = E / c2
• Coulomb/ second
• Current = amperage = amps = a
• Voltage is like potential / pressure / gravitational pull

Amperage
• How many electrons

Voltage
• How much strength they have

Watts = Volts x Amps

Atoms
• Electrons – valence sheet gardens

Electricity
• Electrons go from one atom to the other
• Atoms with “vacancies” are good conductress
• Insulators have no/little vacancies

Circuit

• All LEDs have a flat side – flat goes to 0V (ground)

Bread board (protyping board)
• Put LEDs across different rows
• Voltage regulator
• Takes the voltage down to appropriate value
• Instead of using batteries, plug into wall
• 2 LEDs of 1.7V = 3.4 voltage regulator
• Most microchips use 5 Volts
• IGO – In Ground Out
• Red Line => Voltage

Strip wire 1/4 or 1/8 of inch
• Place on bead board where you want it
• Take out
• Cut / strip / back in

In diagram:
Voltage is 5V, LED is 1,7 - need resistor not to blow it up - what resistance?
-> 5.0 V (power supply) - 1.7 V (LED) = 3.3 V (need to drop ot this current)
-> V = IR => R = V / I => R = 5v / 0.02 a => R = 165 Ω
-> 165Ω would be exact - always put a greater resistance than required - 220Ω would do

• Ohm’s Law => V = IR (Voltage = Current x Resistance (ohms Ω))
• W = IV (Watts = Current x Voltage)

Resitors Color code
• 0 = black
• 1 = brown
• 2 = red
• Poster in the lab
• Nice link:
• http://www.breakup.de/resources/resistor.html

Switches
• All kinds – basically good marketing on two metal pieces touching each other
• ON – closed circuit
• OFF – open circuit

ADMIN STUFF
• We are a week off the other classes
• Friday help sessions are a week ahead
• “Make up” session on the 23rd?
• Read syllabus
• Choose week you do notes on
• Join pComp list serve
• Introduce yourself on the class site
• Sign up for shop cleaning
• Do shop safety
• Look at links
• Think about the light bulb glasses
• Keep journal for class – document your work
• Look for blog with RSS feed – it will feed the wiki
• Read chapters 1 – 3 of Physical Computing book
• Course packet – buy it at NYU book store

Assignment 2 - part 1

Using Arduino - microcontroller... had some hick-ups installing it but finally got it to be recognized via the USB port and have it get the program... but now the circuit does not work... will have to get some help tomorrow morning...


Sunday, September 17, 2006

Assignment 1 - part 5

Potentiometer - home made dimmer:

Assignment 1 - part 4

Three LEDs in parallel lit up nice and strong:

Assignment 1 - part 3

Three LEDs in series - did not light up - not enough voltage:

Assignment 1 - part 2

2. Two LEDs in series - light up dimly - no need for resistance since each LED will drop the voltage

Saturday, September 16, 2006

Assignment 1 - part 1

Switch lit up LED - yeay!